We are God’s workmanship, created
in Christ Jesus to do good works,
which God prepared in advance for
us to do.
Ephesians 2:10
Ideas for stay at home moms, teachers and anyone who loves to play with children
Showing posts with label homemade. Show all posts

Monday, February 6, 2012

Homemade games for kids

I love making fun stuff for cheap for kids to do. These are both games that can be played inside on a rainy day, outside enjoying some sun or for kids birthday parties. Plus you can have any age group play with the first one from toddlers to mommies and daddies. Anyway you look at it they are going to have a ton of fun. Me and a friend made these for our MOPS group for the MOPPETS program. If you don't know about MOPS it is a Christian based group for Mothers of Preschoolers. (really age 0-5) it is amazing. here is a link to the MOPS site so you can get more information on it.

I got buckets from the dollar store and H is trying to toss a bean bag in it. You can make this game a lot cheaper by using large aluminum coffee cans. and you don't have to use a bean bag you could use a ball, a pair of socks as your folding laundry, a small stuffed animal anything really. We have the buckets numbered so that way when she makes the bean bag in the bucket she can tell me the number she made it in to help with number recognition.
This is just a simple ring toss from paper plates and a wrapping paper roll left over from Christmas wrapping paper. just take the paper plates and cut the center out and paint them different colors for fun. Then stack a couple plates to make sturdy and glue together for base. take the wrapping paper tub and cut slots at bottom to flip out and glue down. and the game is ready to begin. This is a little challenging for the toddlers to get the motion of the frisbee but not impossible.

Wednesday, December 7, 2011

Pin cushions

I don't know about you but every time I sew I am always hunting the pin cushion. I gets moved or hinds under the material. Well I got tired of it the other night when I was sewing and made this. I am not sure what I should call it or if it has been done before, but I was quit proud. I made a pin cushion that has ribbon attached to it and it can tie around sewing machine. it doesn't move and is really handy. Thought I would share.

Wednesday, November 2, 2011

Fall Dress

Last year I made H this pumpkin shirt for our trip to the pumpkin patch. Well this year it is to short so I made it into a dress. I just add fabric to the bottom and a ribbon on top to hide my mess lol and now she is ready to wear it again. I made it a little long so she may be able to wear it next year too.

Thursday, October 20, 2011

Halloween wreath

I have made a couple of these tips of wreaths in the past for friends having babies and they are so easy to make. This year I decided to make a Halloween wreath. All it is about 2 yards of fabric cut in to 1 in wide and 6 inch long pieces of different colors and patterns. and you just tie it on the wreath. I go the wire wreath basic that has 4 layers of wire wide so it is fuller you can get it a hobby lobby for $1.99. I should have taken a picture of the base first but didn't think about it till just now. After you material is cut you just start to tie it onto the base it really is just that simple. I made the plaque in the middle with a unfinished piece of wood that I painted orange and used puff paint and free handed the black dots, ghost and words. The whole thing cause me like $3 cause I used scraps of material I already had at the house.

Monday, September 26, 2011

Homemade Menu

My daughter is always asking me, "Mommy, what do you want to eat." she wants to take my order like at a restaurant. Only problem is no matter what I order she is out of that. lol so I said to myself I'll fix that, I can get her to make a menu for her restaurant from grocery store ads. That way I have to pick something on the menu. So I got some old ads and let her cut out what she wanted on her menu. She did fantastic cutting them out but I did have to trim them up a little to make them all fit on the page. I wrote Menu on top and what each thing was under the picture so she could see the written for of the word as well. then put it in a clear protector page and taped the top with packing tape. She loved it and loved cutting and helping me glue. I let her put the glue on and I put it on the page just to make sure it would all fit. Then she used the leftover ads to make a food collage.

Oh and by the way my first order was pasta salad and they ran out she already served it to daddy and it was to late to make more I had to chose something else. Oh well I tried.

Sunday, September 11, 2011

Bored Jar

So I have seen a bunch of people make "Bored Jars" and I thought that it was a really good idea. So here is what I have come up with for ours go my inspiration here http://mushkiloves.blogspot.com/2011/05/potty-prize-jar.html
"> .


Saturday, September 10, 2011

Push board

I made a push board that I made for a friends little girl for her birthday. I just took a push aboard and hot glued the fabric to it. then ribbons and feather boa. It was really easy.

Wednesday, April 20, 2011

Soup can crayon holders

My daughter had a pencil case that was overflowing with crayons, markers, and color pencils. So I decided to reuse some soup cans ( the ones that have the pile off lid so that she doesn't cut her finger on a jagged edge) to put her drawing supplies in she has 3 cans so she can sort them in the right place and it looks a lot cleaner on the desk. I want to add cute paper and decorate them some time.

Sunday, January 23, 2011

Valentine's Decor

I really like all the cute Valentines stuff but money is tight so I decided to make my own art. This cost me nothing cause I had all the paints, and a canvas. The canvas at the store is $3.99 and paints about $1 each. This just made me smile.

Saturday, November 6, 2010

Halloween

Here is a picture of H in her ladybug costume I made her and the trick or treat bag I made her (it doesn't match the costume but it is for many years so it is just Halloween themed. I got the idea for the bag here)

Friday, October 29, 2010

Homemade bats and tshirts

We went to a birthday party and they had black bats all over for decoration and H feel in love with them. She asked if I could make her some. So I found an old pattern of a bat and got a piece of foam, cut them out and put them up with sticky tack.

The shirt I made for the pumpkin patch. I found the wonder in wonder under. lol. you iron it to back side of fabric cut out a shape peel off paper on back of wonder under and iron it on the shirt. what could be easier. It stayed wonderfully but after washing the fabric started to slightly wear so I am going to add a zig zag stitch around it.

Thursday, September 16, 2010

Saturday, September 11, 2010

Making bean bags and games to go with them

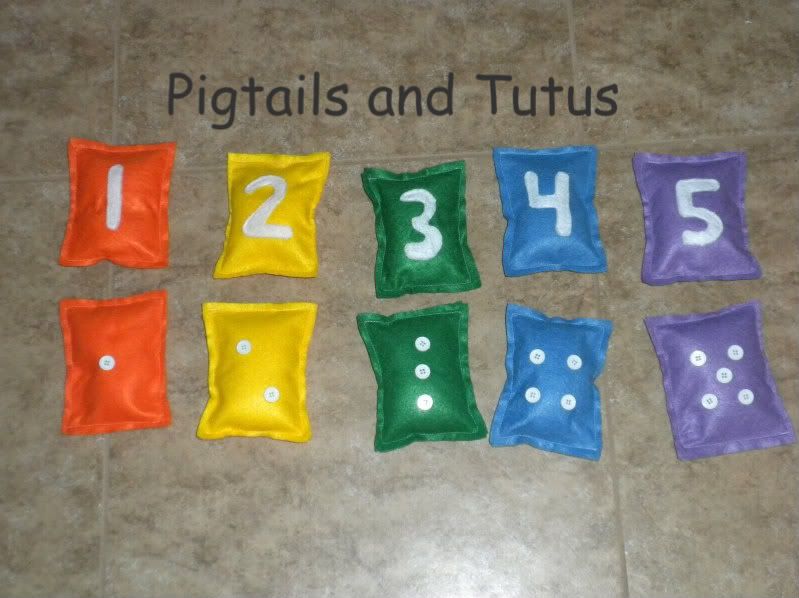
Bean bags are so much fun for kids and so easy to make! They can be made out of any scrap material and stuffed with lentils, rice, and beans. These are 5 in squares that are sewn wrong side material up and around 3 1/2 sides and then turned inside out and stuffed then I went around the whole top again from front to keep it in


Games for bean bags:
Shape toss all you need is beanbags and construction paper cut into various colors and shapes
What to do: lay shapes on the floor in a grid pattern. Have your child hold the beanbags and ask her to toss it into the red shape. Or ask her to toss the bag into the triangle. These games will help make associations between different colors and shapes.

Head to toe:
Use the beanbags to help the child identify different body parts. Ask your child to put the beanbag on his or her head. Have him find various body parts and balance the beanbag on them (elbow, hand, and so on.) Variation: try balancing two or more beanbags at a time!

Toss course: you will need beanbags and containers (bowls, baskets, etc.) Start by setting up a course - either with or without the help of the kids. Use containers - waste paper baskets, buckets, empty shoe boxes etc - to be targets or “golf holes”.
Now the children take turns tossing their beanbag around the course and into the targets.
Variation: see who can complete the course the fastest, left-handed, etc...

1,2,3!: Have your child throw the beanbag in the air, clap his hands once, and catch it. Now he can try clapping his hands twice, then three times, and so on. How high can he go? Variation: instead of clapping, try jumping or spinning around


Princess races:
you will need beanbags, clear space to race and 2 or more participants
Have each princess balance the beanbag on her head and race from the start to the finish. If the beanbag slips off, she must run back to the start, re-balance the bag and start over.
Variation: try the race wearing high heels and a boa or other princess dress-ups.

Over and Under: you will need beanbags, medium-sized container, chair
Have your child stand back and hold the beanbags. Arrange the container on top of a chair. Have them choose whether they throw the bag ‘in’, ‘out’, ‘under’, ‘over’, ‘behind’ or ‘in front of’ the char and container. See if they can toss the beanbag to the place they’ve chosen.

Another tossing game: you will need beanbags, masking tape
Make a grid of 4 squares on the floor with tape. Have your child stand in the middle of the grid and throw the beanbag into the square that is “top’, ‘bottom’, ‘right’, ‘left’, ‘forward’, ‘backward’, ‘front’, ‘back’, etc. Variation: for pre-schoolers, write numbers or letters on a piece of paper in each grid square and have your child throw the beanbag into the ‘B’ or ‘3’ square.

Friday, September 10, 2010

Homemade musical shakers

I made these for H when she was about 6 months old and thought I would share it with everyone. The hospital suggested these bottles and I didn't care for them but they were $5 a bottle so I made them into shakers for my daughter (hot glue the tops closed). Now that she is two I see her using as play food in her kitchen more than music but she still dances with them too.

Monday, September 6, 2010

Making crayons

Today I got tired of all the broken crayon all over the place so me and H peeled all the papers off the crayons and broke them in to pieces. Then we sprayed a molded pan with cooking spray and she decided what crayons she wanted in each hole and filled the tin. I baked it at 170 degrees for 30 minutes. We talked about how they felt before and what she thought would happen to the crayon in the oven. After we put them in the oven we checked them every so
often to see if the crayons where changing and why do you think they change. (it took about half the time for you to really see them start to change just to let you know.) when they are done we let them cool for about 10 minutes and then took them out. to use.

Sunday, September 5, 2010

unique ways to send mail.

I have been showing H how to recycle around the house and turn thing from old to new. My husband is going to visit his nephews soon and we wanted to surprise them to let them know he is coming. I got an empty water bottle and cut a hole in it 3 sides of a rectangle to make a flap. Then filled it with little toys: bouncy balls, stickers, sticky hands, ect. My husband wrote a note to the boys and I filled it with curling string to sorta hide the things inside to make it a mystery. After you finish filling the bottle put the mailing label on top of the hole and tape all the way around the bottle. write on bottle to remove address label to get into bottle. What little one would not like to get a surprise like this in the mail.


I filled the bottle with a lot more curly ribbon than in the picture

Thursday, September 2, 2010

Homemade play-doh with Kool-aid

Play-Doh with Kool-aid
(home made is non-toxic)

1 Packet of Kool Aid
1 Cup of Flour
1/2 Cup Salt
3 tablespoons of Vegetable Oil
1 Cup of Boiling Water
some glitter (optional)

Mix dry this is important to make the play doh smoother
add wet and stir (parents do this part cause hot).
knead the dough on a sheet of waxed paper
add glitter and kneed in and play!


Sunday, August 29, 2010

Homemade Picture frame

I let H pick out a wooden pre-painted shape and a wooden unfinished frame from Micheal's the other day. He picked yellow and pink to paint with which is her favorite colors and matched her wooden flower perfect. She was amazed to discover that when you mix pink and yellow it makes orange. At first she was trying to keep the colors separate and then once she noticed that if she mixed the two colors it made orange she just mixed away it come out looks so pretty. I was really surprised to see that she covered the entire frame. I figure there would be spots of unfinished wooden unpainted but she cover ever spot. A great project for only $1.49 plus tax and it come out beautiful and there was some great learning.


Sunday, July 18, 2010

Number matching

My daughter is 27 months and we are starting to talk about numbers. She does really well counting to 12 and she points as she is counting with is pretty good for her age but I am now working on recognizing the numbers, so I made these felt bean bags. This is the first set. Since we are just starting I made them color matching. Once she learns the numbers I am going to make a new set in all black and white so she really has to know the right answer rather than match colors.


Thursday, July 15, 2010

Pillow case dress

I made H a new pillow case dress the other day. I am pretty proud of it. I know my way around a sewing machine but I am getting more adventurous lately. My daughter loves it and calls it her "pretty dress" and wants to wear it all the time which makes the whole experience totally worth it. I am going to have to make more of them. The summers are really hot here and it is great to stay cool